


How to Make a Video Photo Montage
Another Way to Present Your Images on Social Media

I enjoy scrolling through SubStack Notes and noticed that some of the fellow photographers to which I Follow and Subscribe have started using video as a way to present their still-image works. I became intrigued. I thought to myself,
"I could do that!"
I make product related videos for Essential Confection desserts for
as well as editing short videos that she posts on social media sites. I've been using Final Cut Pro X (FCPX) on MacOS for over a decade, so this is right up my alley. FCPX is overkill for most people, as there is quite a steep learning curve. I used FCPX to create the video below:There are many tools available that are easier to use on both PC and Mac that have templates and free music. Camtaisa is one tool I've used for several years. It costs about $300 and is installed on your machine. Its main use is for screen recording, and they have added extras for easily making video/photo montages. Be advised that, as of this writing, Techsmith has transitioned to a subscription pricing model from a flat fee, so make plans accordingly in the event you choose to use their software.
There is also a plethora of online video editing sites out there that are low cost. I prefer not to use most of them as I want to control how my images and video are stored and used. Some sites claim your media as part of their own AI training or other uses I don't approve of, so read their Terms of Use carefully before uploading your creative efforts. Use online video editing sites that you trust.
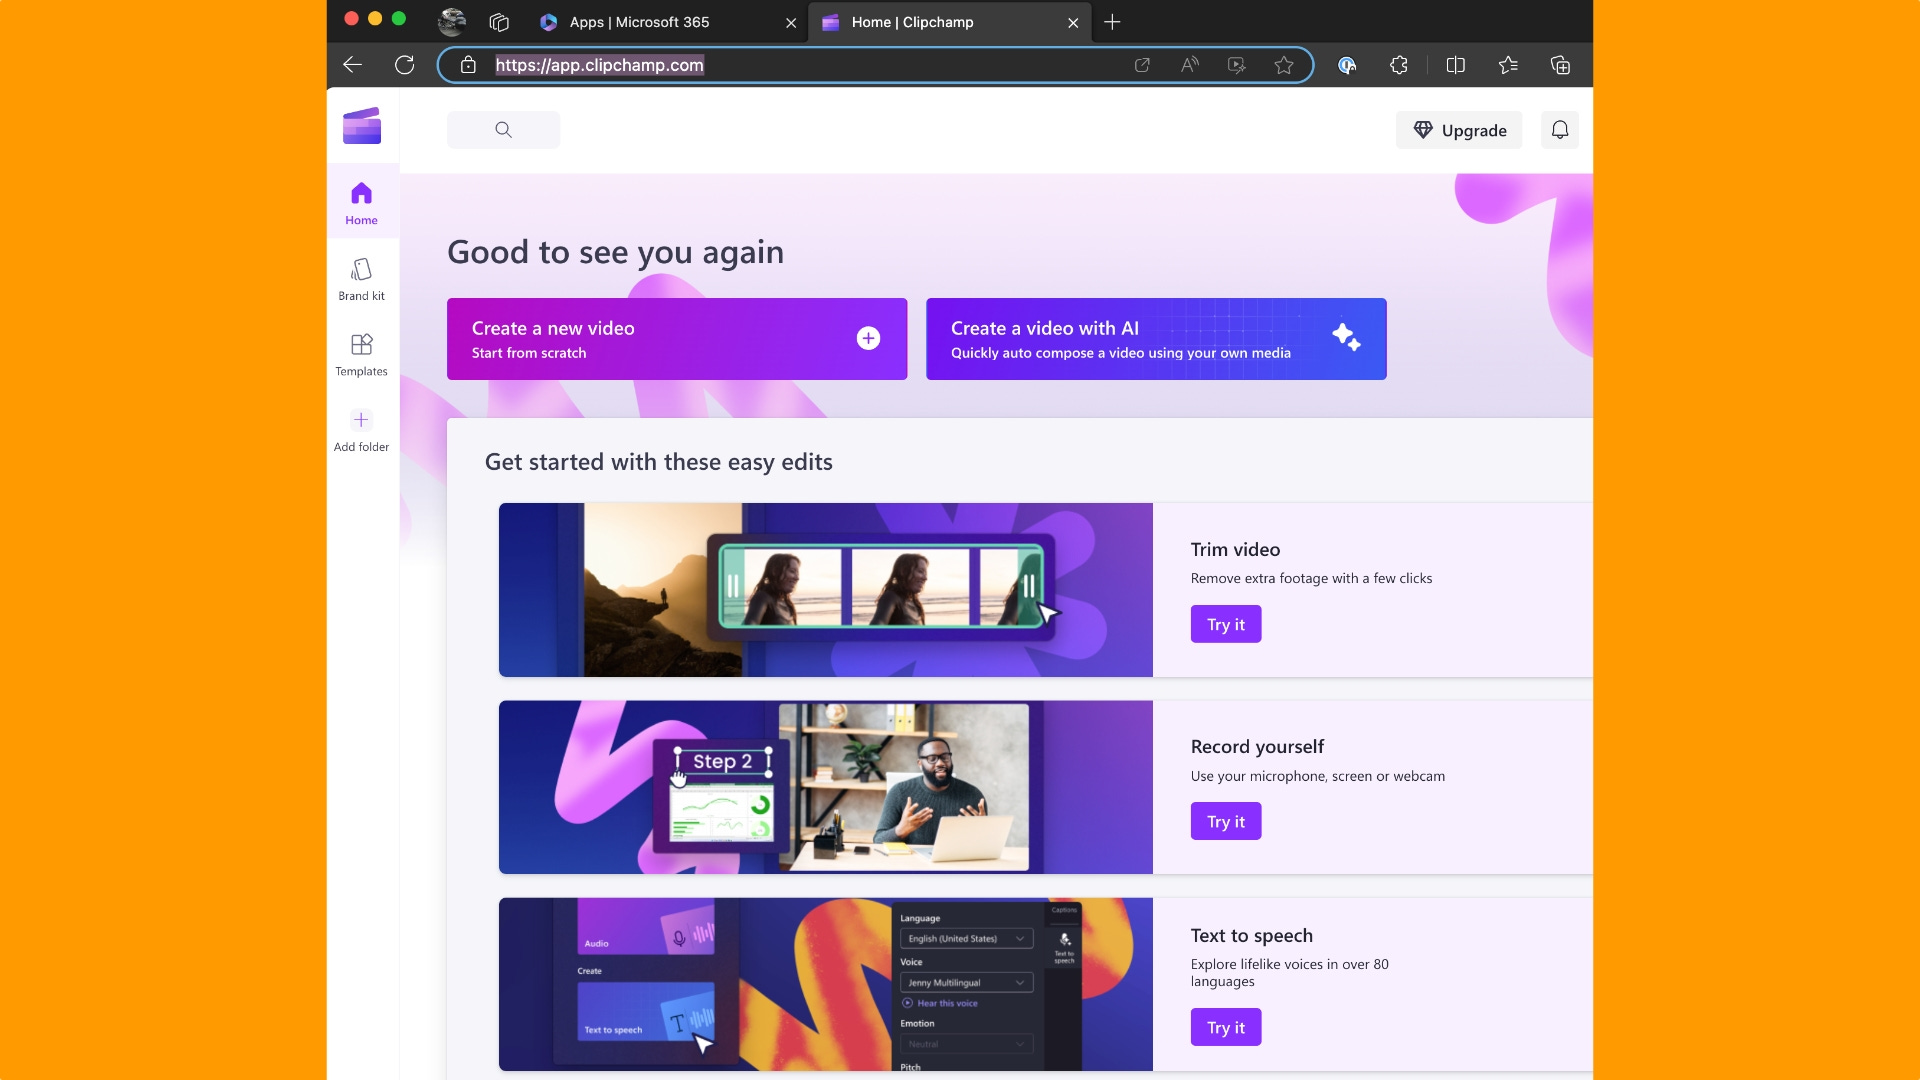
If you subscribe to Microsoft 365 Office, you automatically have access to their ClipChamp online video editing tool.
Branding & Copyright (I'm not a lawyer)
I've noticed many photographers not asserting copyrights in their images on SubStack.com. Although copyright can be asserted in the image metadata data and registration with the US Copyright Office, my personal preference is to add a notice in the image or video in addition to registration. Other photographers prefer not to add anything into the carefully crafted image, and I get that. Each artist makes choices that work for them. Also, any images or text created by Artificial Intelligence cannot be protected by copyright laws, so be mindful of that when asserting copyright in your creative works.
I also prefer to use the branding developed when I created my SubStack publication. For me, it makes sense to include branding with my images to provide a consistent "look & feel" for my videos. Again, many photographers I follow and subscribe to do not use much, if any, branding. Make choices that reflect how you want to best present your work.
Stock images and music are freely available online that can be used for both personal and commercial video projects. Free stock image sites, such as Pixabay.com have enormous libraires form which to choose photos, videos, and music for free. The do require you disclose that you acquired the asset from them when you download the item. There will be a short attribution statement for you add to your project so you can remain compliant with their Terms of Use and existing copyright law. When downloading, look for the option to download the license certificate for that image or song and keep it in your project folder for your records. You can use it to help refute claims of copyright infringement in the future.
Do NOT use music from any well known artist unless you have verifiable permission to do so. Otherwise, you risk expensive infringement of copyright litigation and no one wants that. Many software packages and online video editing sites have pre-paid licensing fees to artists and secured permission for use of their creations in your projects, so it is are safe to use their content without attribution.
Workflow for Creating a Video Photo Montage
I'll be using Microsoft ClipChamp for this workflow tutorial and the processes should be easy to extrapolate to whichever tool you decide to use. You may find that your tool has shortcuts and templates to do some of the processing included here that will save you time. Use them! Consider my steps as "stick-shift" and others may be more "automatic". We are after an enjoyable result regardless of the tool used.
A note on browsers: I'll be using Microsoft Edge to access ClipChamp. Microsoft Edge is available for PC's, MacOS, and Linux platforms. Edge uses Google's Chrome open source code and has been customized by Microsoft to work with their services. I found that ClipChamp complains that it can't start up in a Chrome-based browser with extensions enabled, so I'm using Edge with zero extensions for this project. This works OK for me, as I normally use Brave, a security-focused Chrome-based browser for my daily activities with several extensions enabled.
To access ClipChamp online:
Start Microsoft Edge browser
You might consider temporarily setting it as you default browser during your editing session then setting your normal browser as default when done. Your choice.
Sign in to Office Online with your Microsoft account
On the left menu bar, click on the grid icon labeled Apps
ClipChamp appears in the upper portion of the screen along with the standard Microsoft Office applications
Click on ClipChamp and you are now in the video editor
Step 1 - Gather Your Production-Ready Assets
Photos: these should be display-ready: cropped, edited, post-processed. I recommend resizing the images to the video output format. For this tutorial I'll use 1080 pixels horizontal by 1920 pixels vertical, which works well for mobile phones. Place these into a folder on your computer for import into your editing tool. It will be helpful to number your images sequentially so they make sense and are easy to find during editing.
Branding: Gather logos, images, and any background images needed and place them into the same folder for import.
Titles & Colors: Titles are text overlays superimposed on the images that provide information for the viewer. Using a standard font throughout the video makes it easier to read. Plan for contrasting colors for readability when placed over any images. You may need to enter Red-Green-Blue (RGB) codes to get the exact colors desired and most tools have the capability built-in to accept RGB codes. Research and record any RGB color codes needed.
Music: Music is an option to consider when planning your video project. Choose music that aligns with your particular taste and fits the set of images your are displaying. Fun and dynamic images may be enhanced with contemporary music. So called "Fine Art" images may benefit from soft "Classical" orchestral music or none at all. I’m thinking Vivaldi’s Four Seasons as an example. Its really your choice to decide what type, if any, works for you.
Step 2 - Create a Project & Import Your Assets
Fire up your video editor.
In the top left corner of the window, replace "Untitled video" with a title for your video project
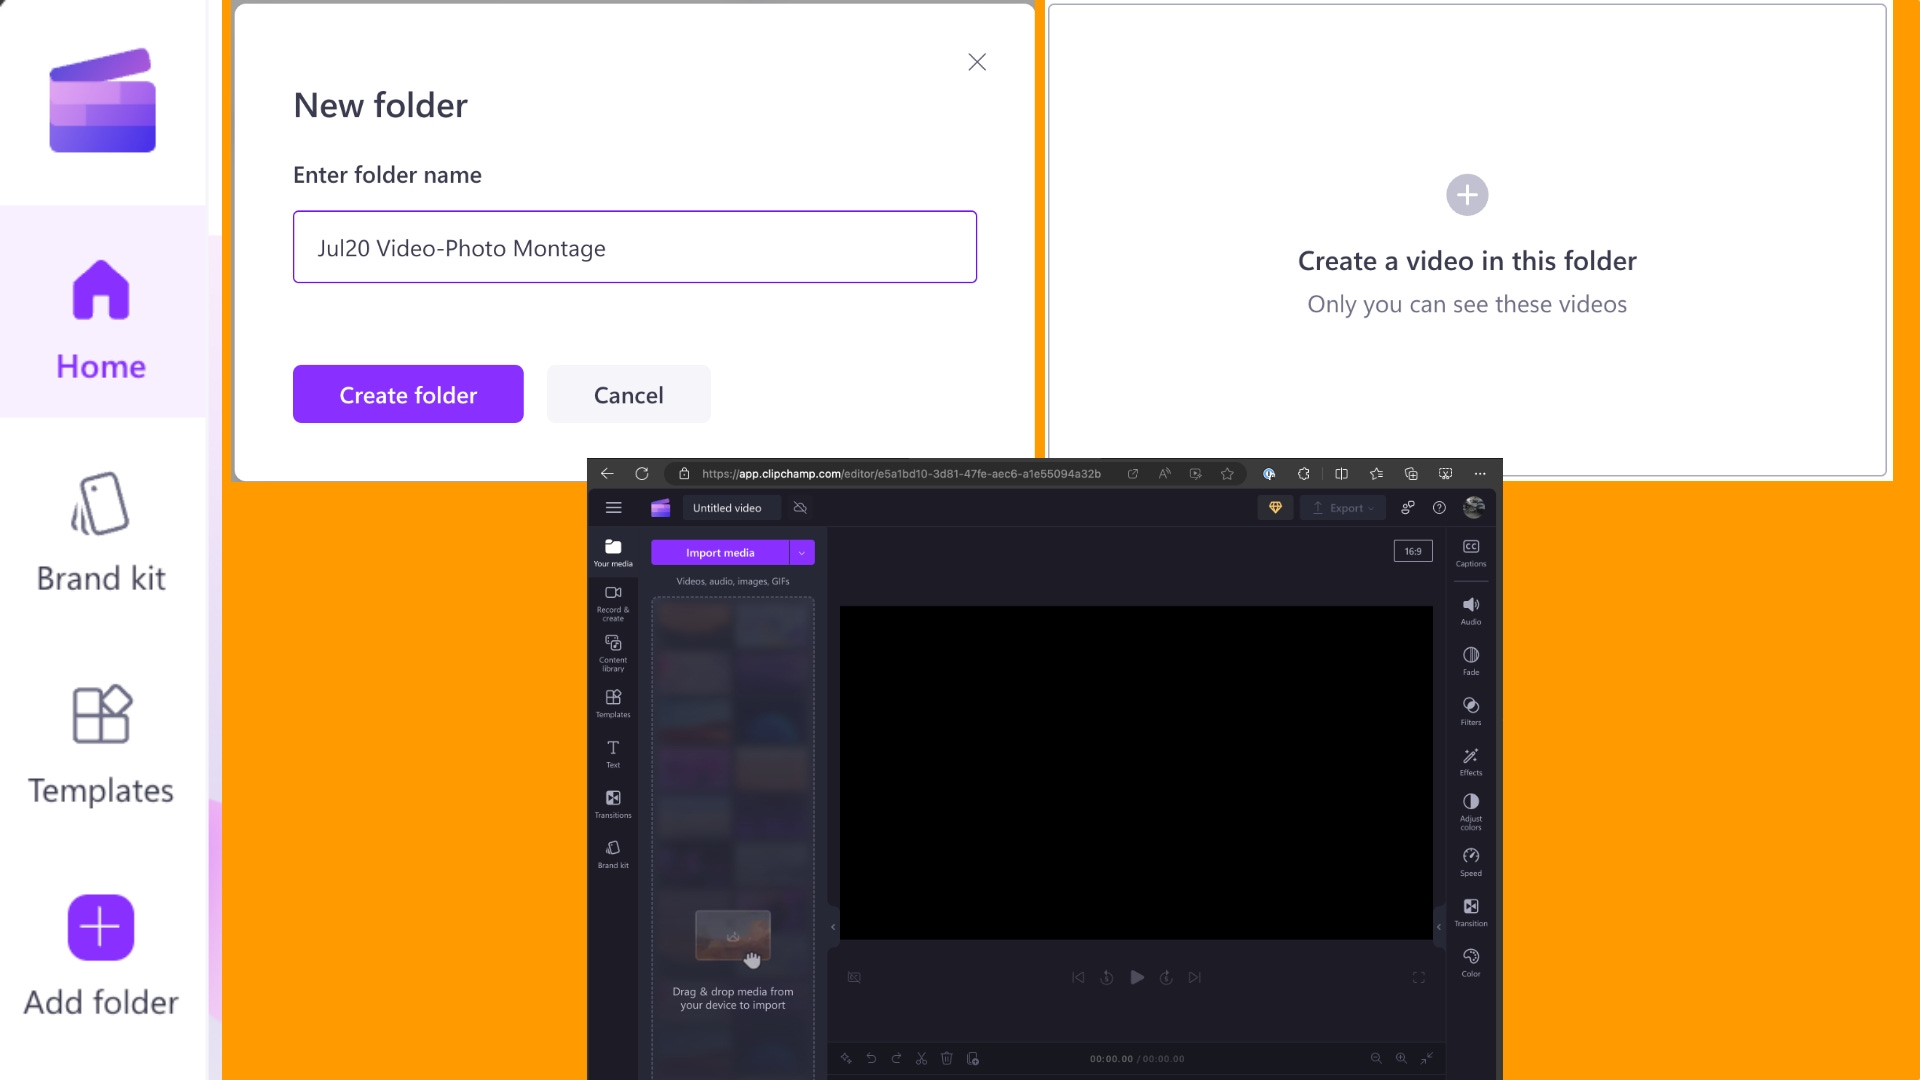
Click Add folder
Name the Folder. This is where all your work will be done to create your video.
Click Create folder
Click Create a video in this folder. This brings you to the main editing screen (I use a dark theme for my desktop, hence the dark background)
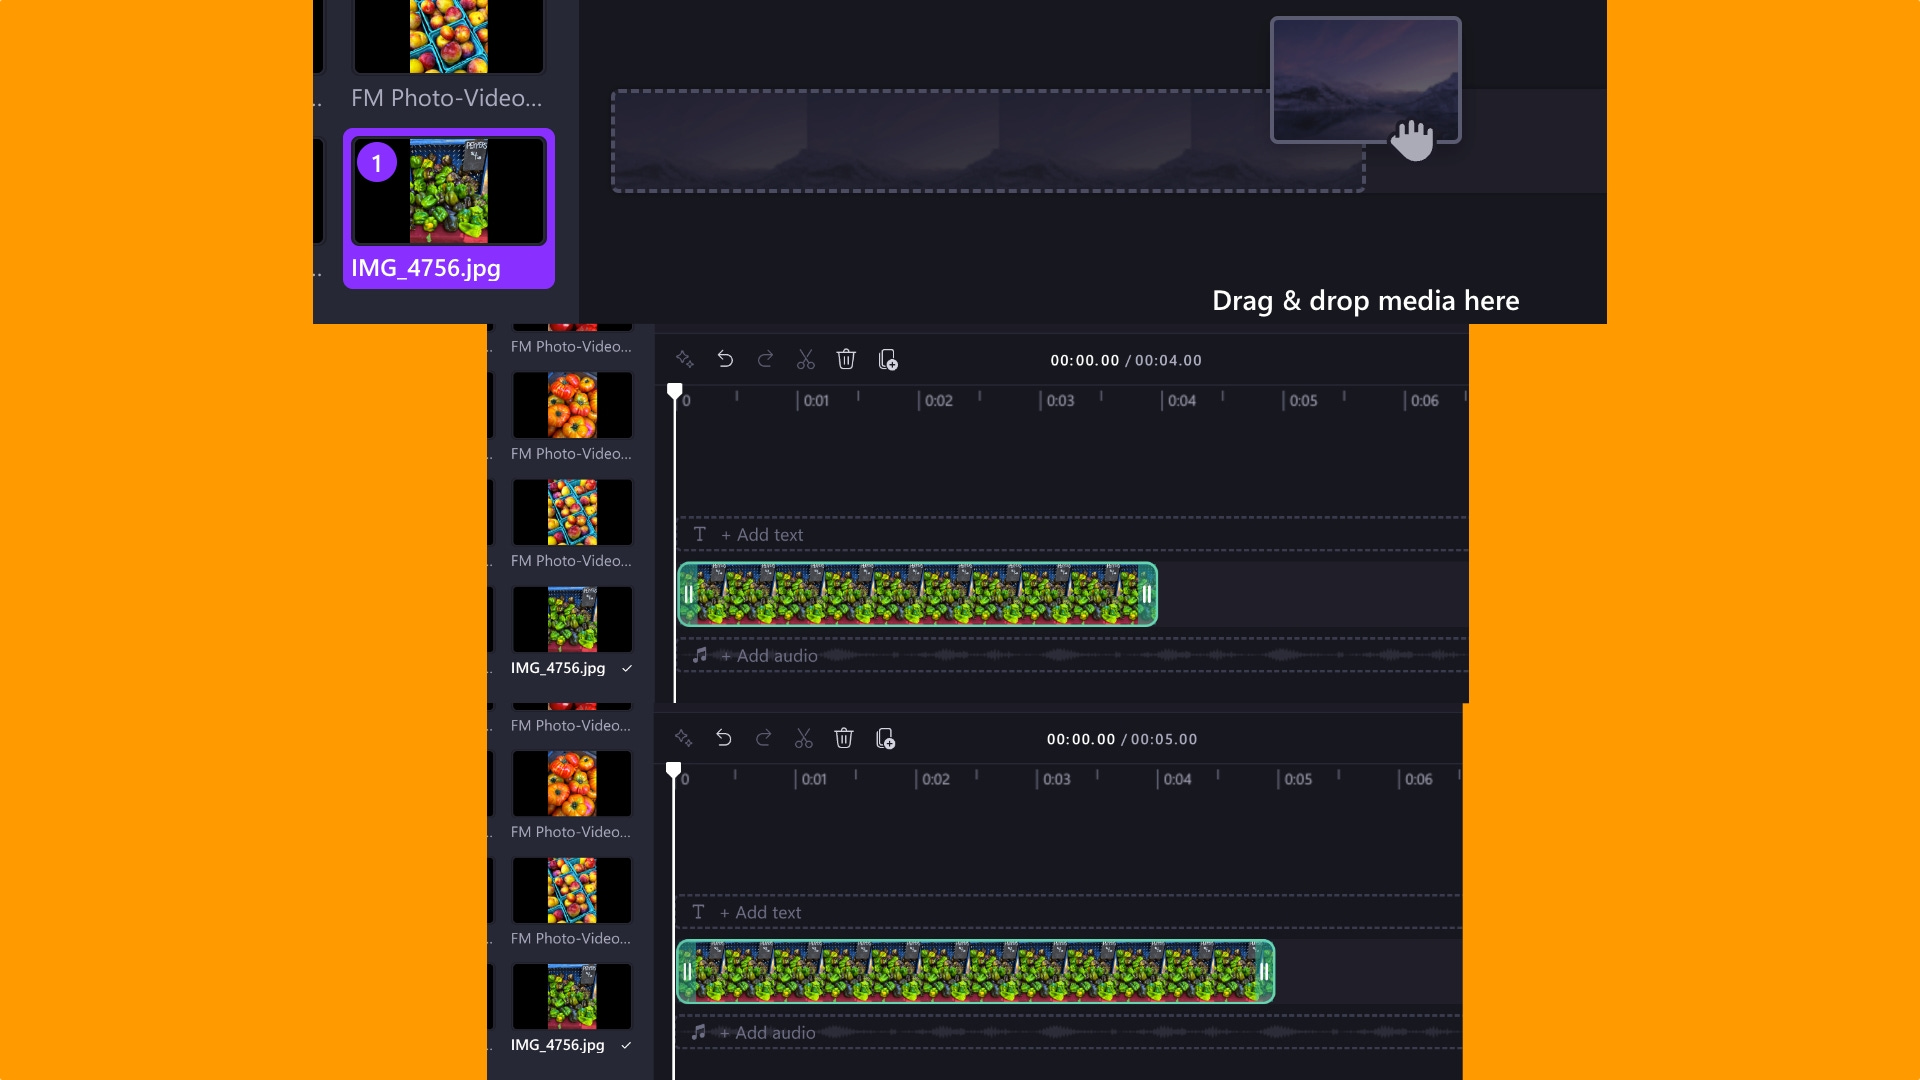
Next, Import your assets from your local storage folder into the project. Once import is complete, you should be able to drag-n-drop individual asset onto your video workspace, also known as the Timeline.
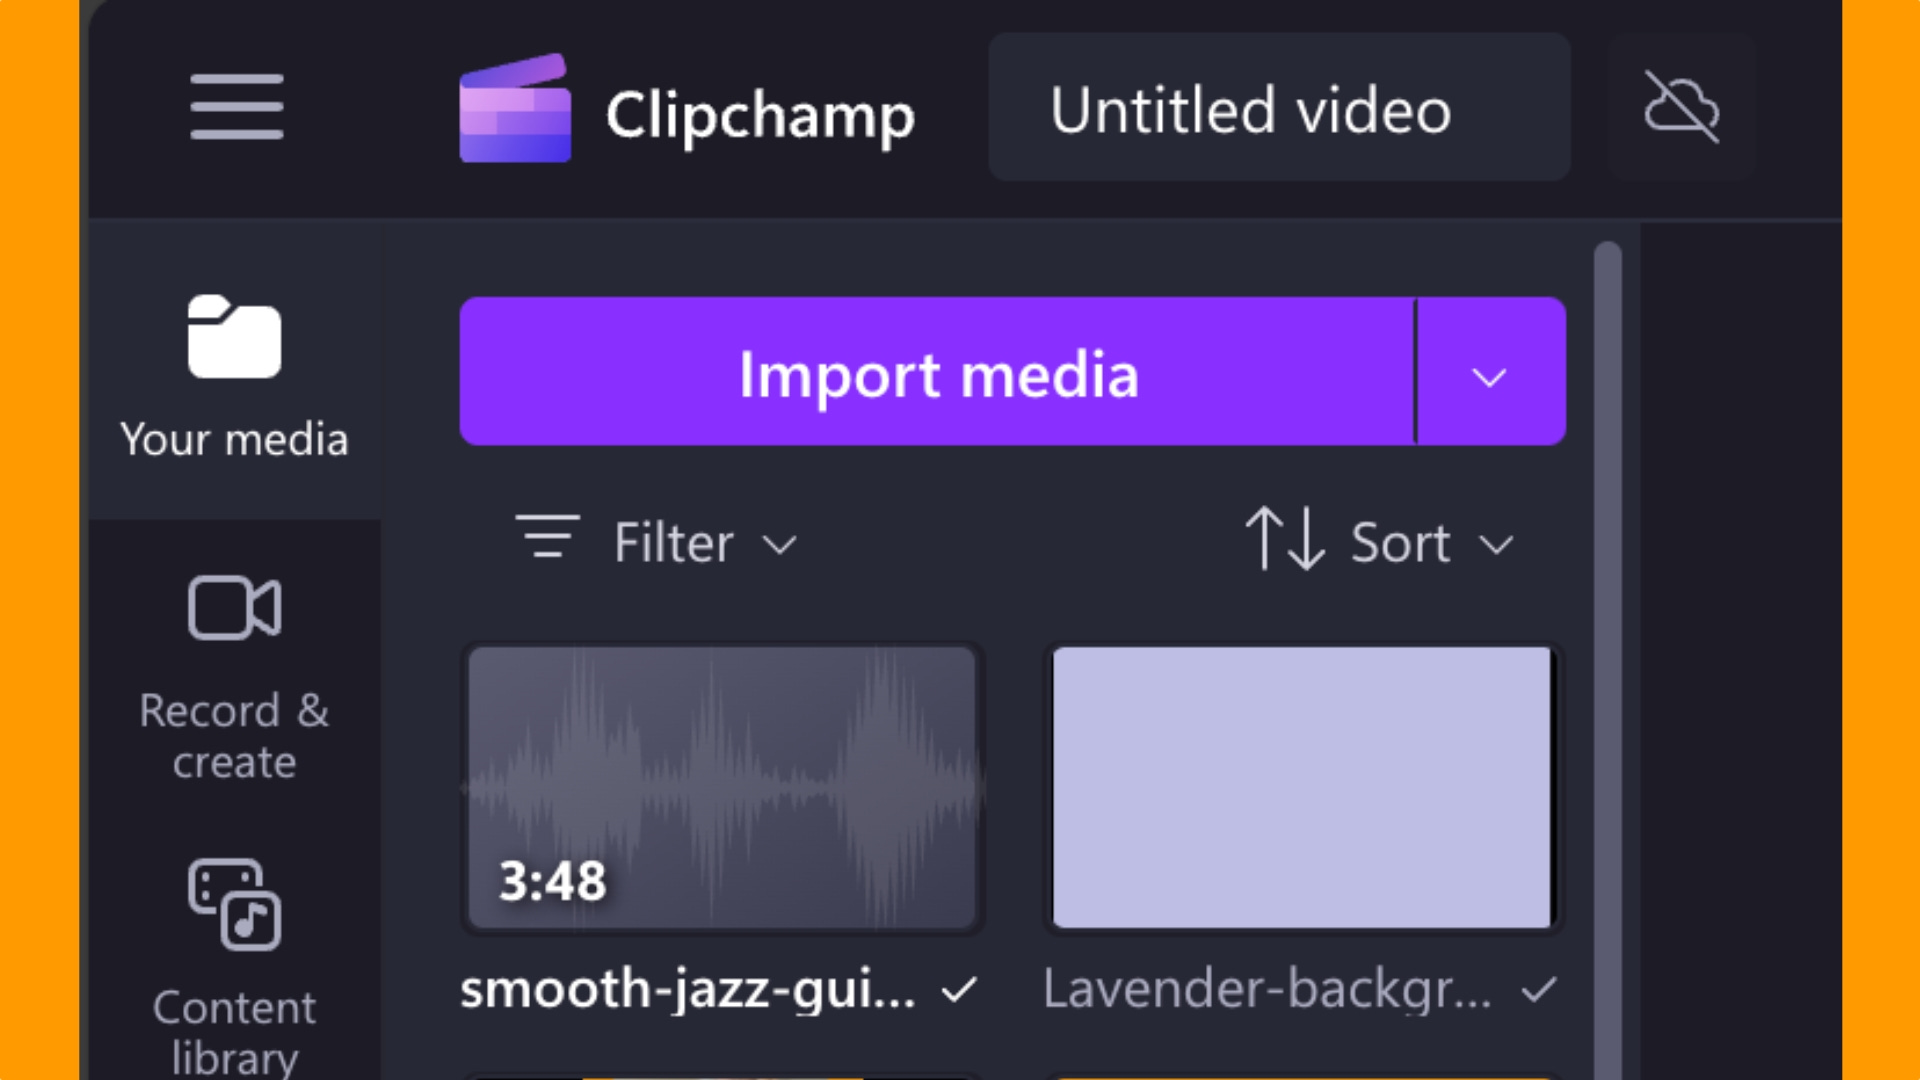
Click Import media
Navigate to the folder on your machine with your prepared image assets
Select ALL the assets in the folder, then click Open
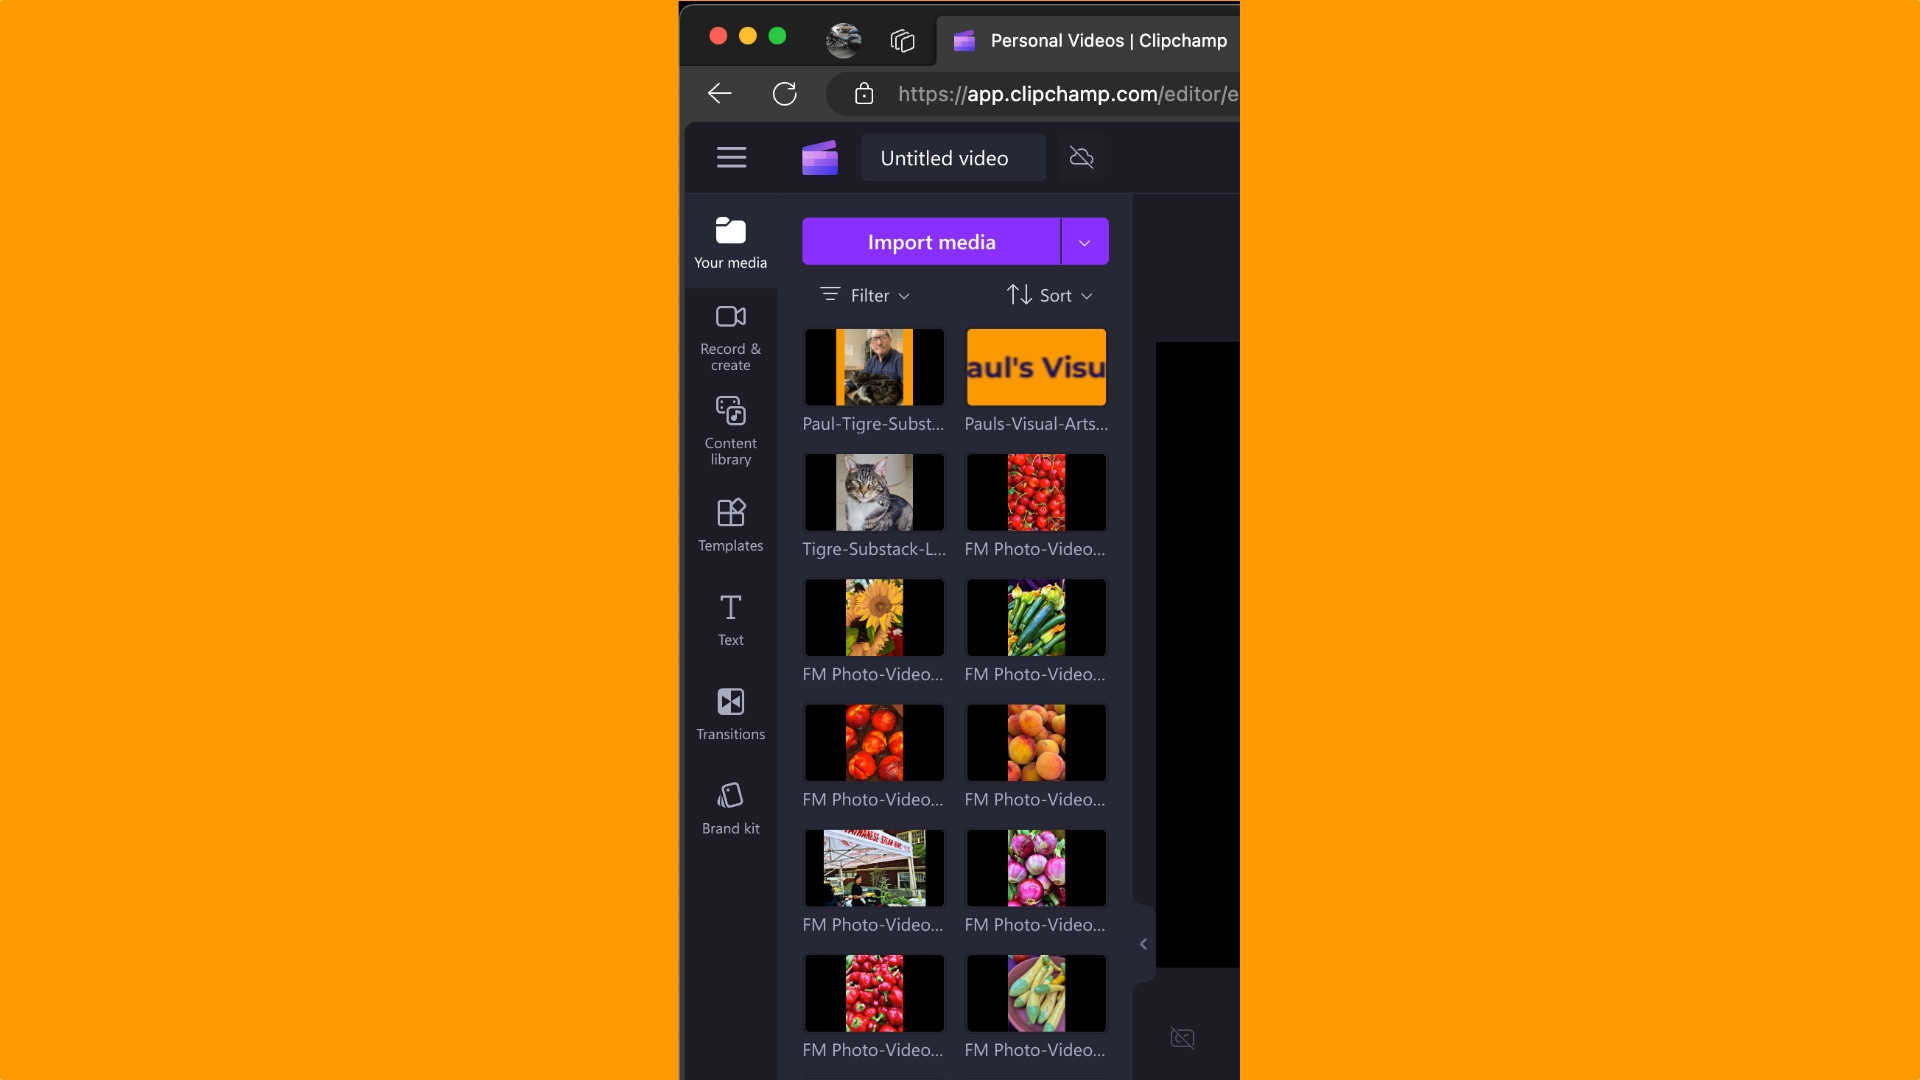
Your assets are imported into the Media library and are now available on the left hand side ready for use.

Step 3 - Place your Opening Image on the Timeline
This is the most important image of the set! It becomes the viewers first impression. Make it count! Alternatively, you may want to have a Title Page image with text and branding so as not to distract from your images. Your choice, you are the decision maker.
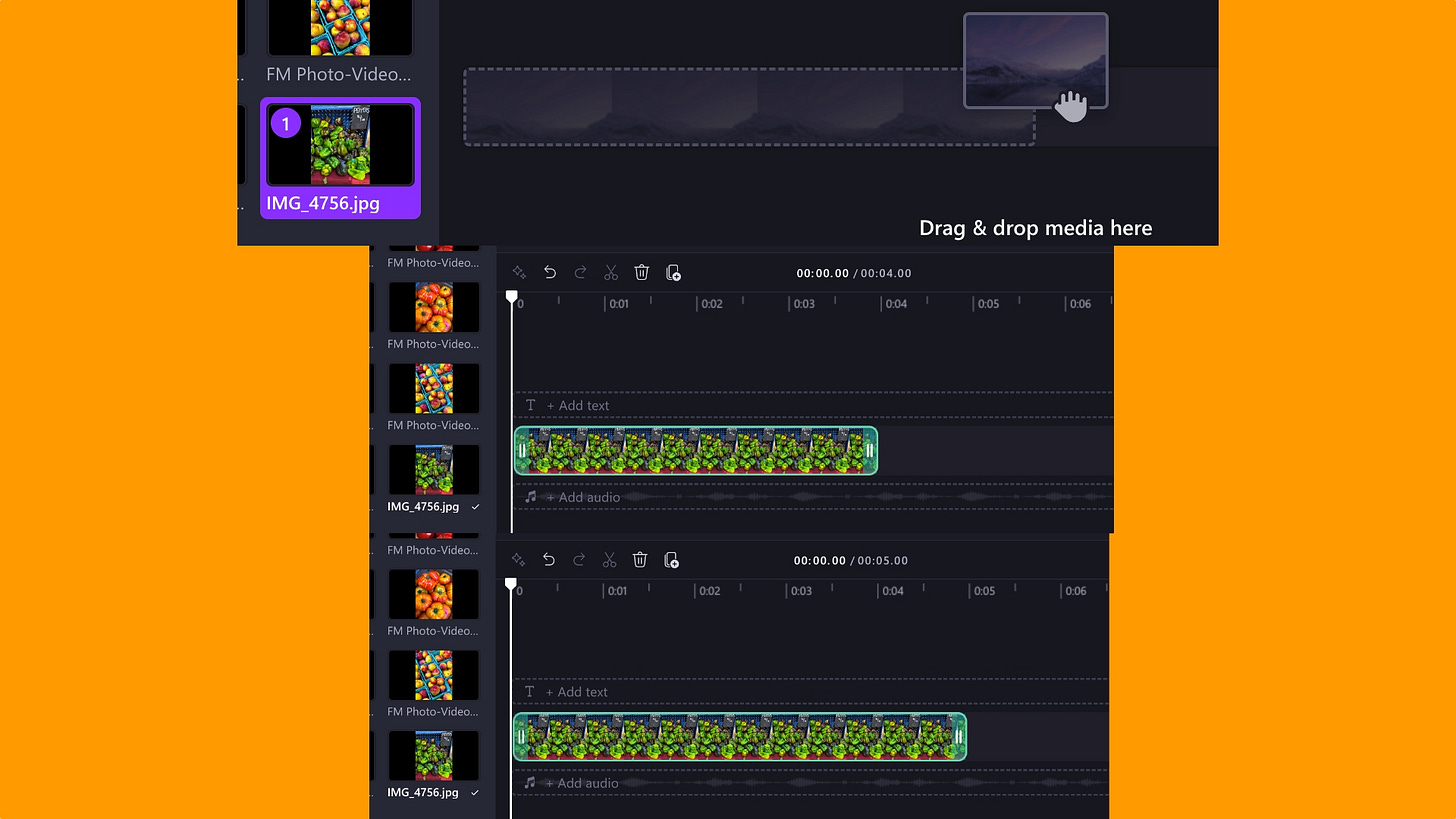
Click on your asset on the left side
Drag it to the timeline
Stretch your image to change its display duration to about 5 seconds.
I've found 5 seconds to be a reasonable time frame for people to view a series of images. You can do longer or shorter as you wish. Experiment to find a duration that works for you and the images you are presenting.
Step 4 - Add Title Text to Identify Your Video
Use your editors Title tool to place opening text that identifies your video. Again, you may elect to not use any, I prefer to do so. Add a descriptive title that tells the viewer what to expect. In this day of pervasive social media, many viewers will pass you by if they don't know what you are presenting. Your tool may have templates available to help with placement, font, and colors. Use them if they fit your project.
Click your image and you will see "handles" at each corner
Use the handles to adjust the image size to make room for text
Click the "T" icon on the left to enter Text Mode
Click "Plain text" and drag it to the desired location in your image
"Add your text here" is prepopulated in the text box. Double-click to highlight all text in the box, then enter your desired text
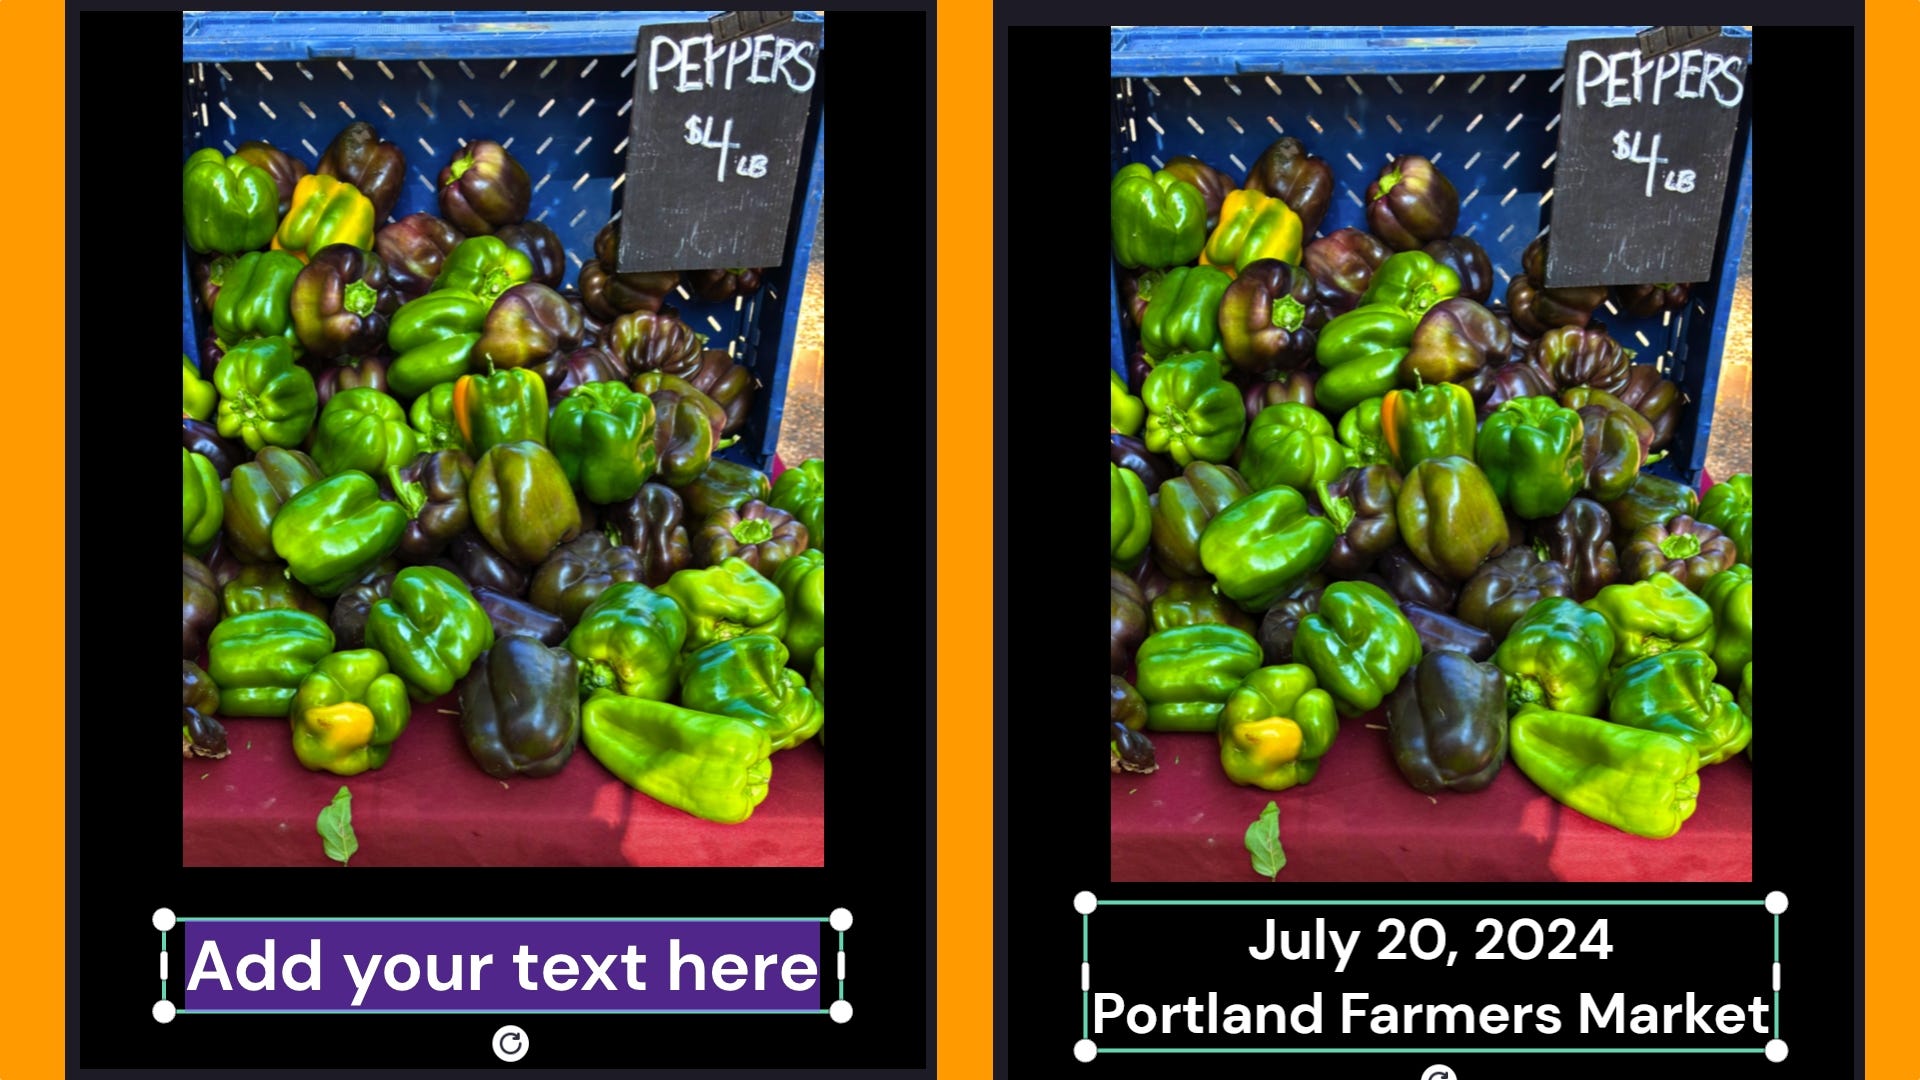
Type your information
Use the handles at the corner of the text box to resize the box and text to fit as desired.
Click the "T" icon on the right side to choose desired font. I'll leave mine as is.
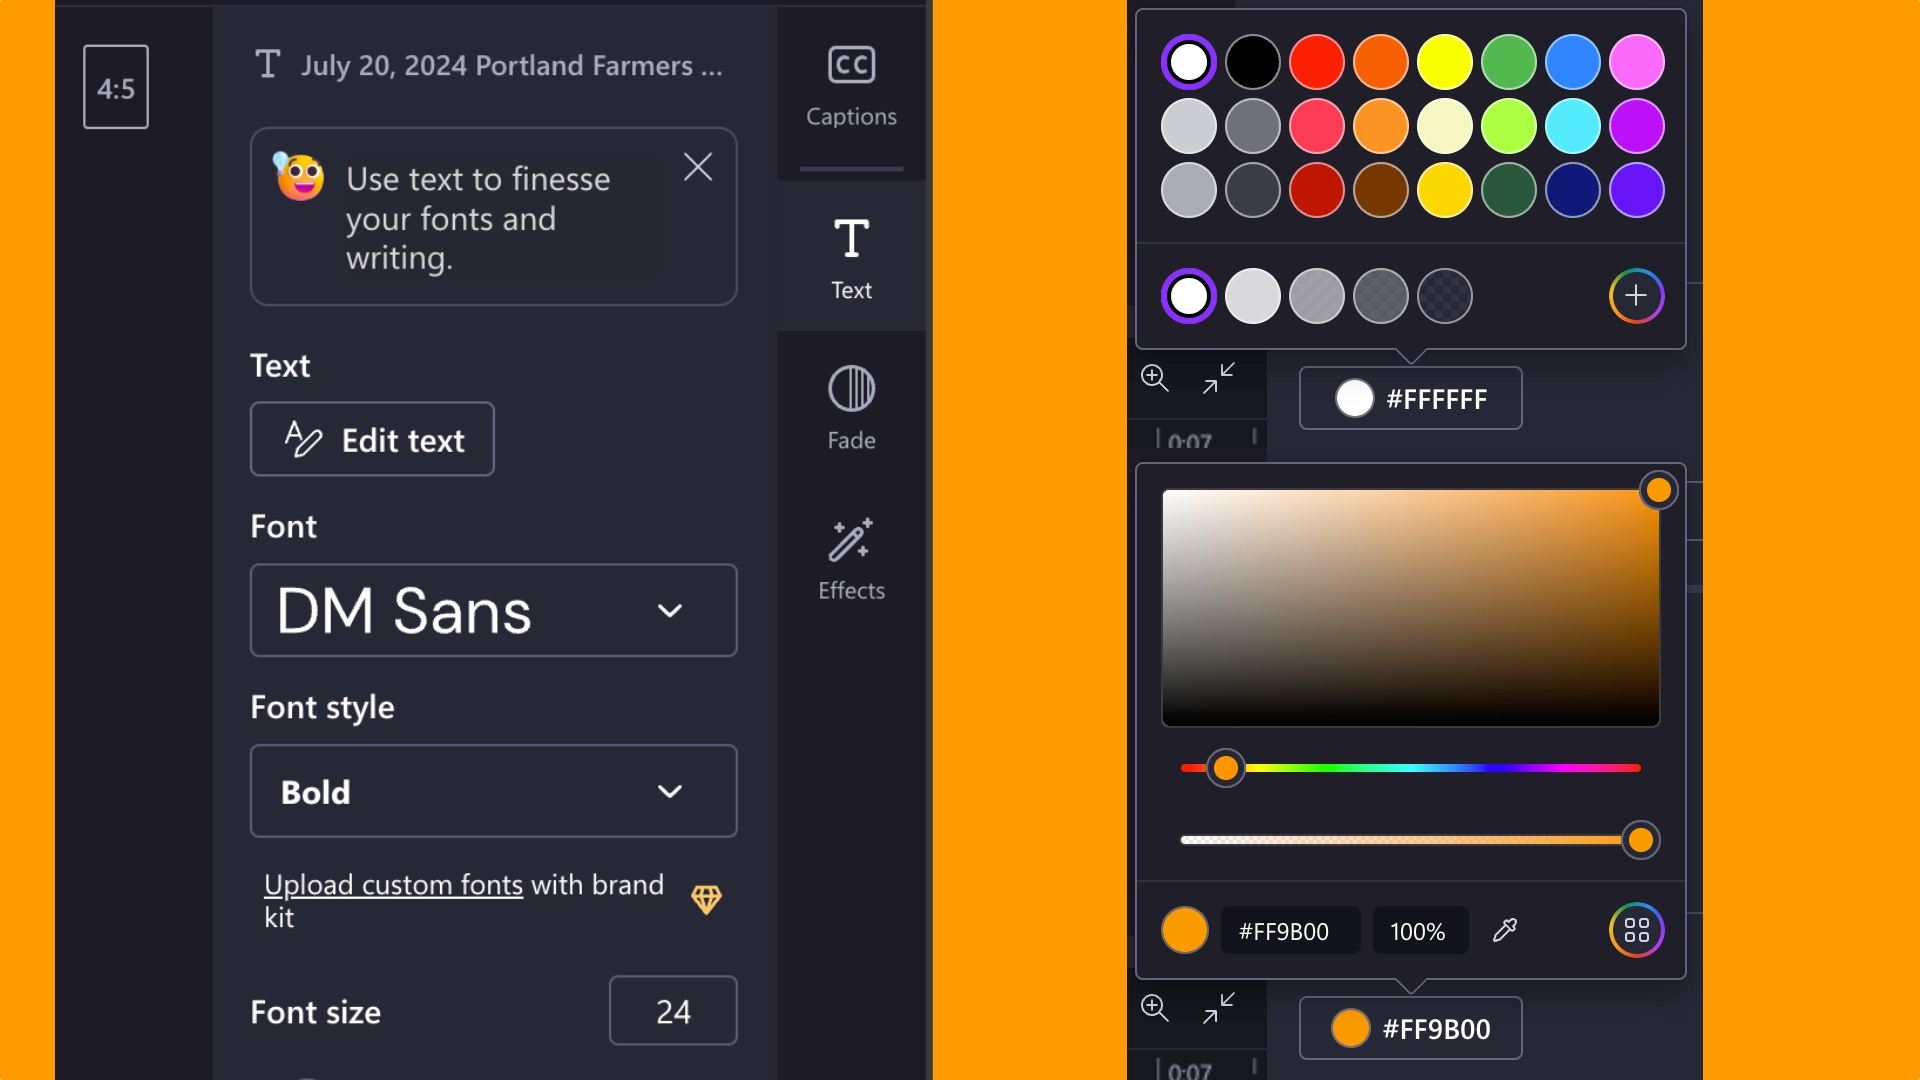
To adjust text color, click on the box below "Color"
Choose a color from a palate if one matches your desires
If you have a specific color to use, click the circle with the "plus" (+) mark and enter to color code you have planned earlier (remember that?)
Text color is now adjusted
Step 5 - Place Your Remaining Images in Sequence
Drag your images from your editor tool Media window onto the timeline according to your planned sequence.
You will need to adjust your window to fit them all in as you go.
Us the -/+ icons in the lower right of the upper image window to change magnification as you work.
Use the slider at the bottom of the screen to bring more of your project into view
Stretch each image to be on screen for 5 seconds
second image starts at 5 seconds and ends at 10 seconds and so on
Try to tell a story with the images. Use a variety of color sequences so the viewer sees complimentary colors in the sequence: blue, then orange, then yellow, then red, for example. Contrast dark and light images in the sequence. Make the sequence enjoyable for the viewer. Watch your timeline to ensure you keep the project short: 1-2 minutes. This duration fits the limited attention span many viewers will allocate to watch a video. Longer videos risk loss of viewership. Choose a longer duration if that will present your photos better.
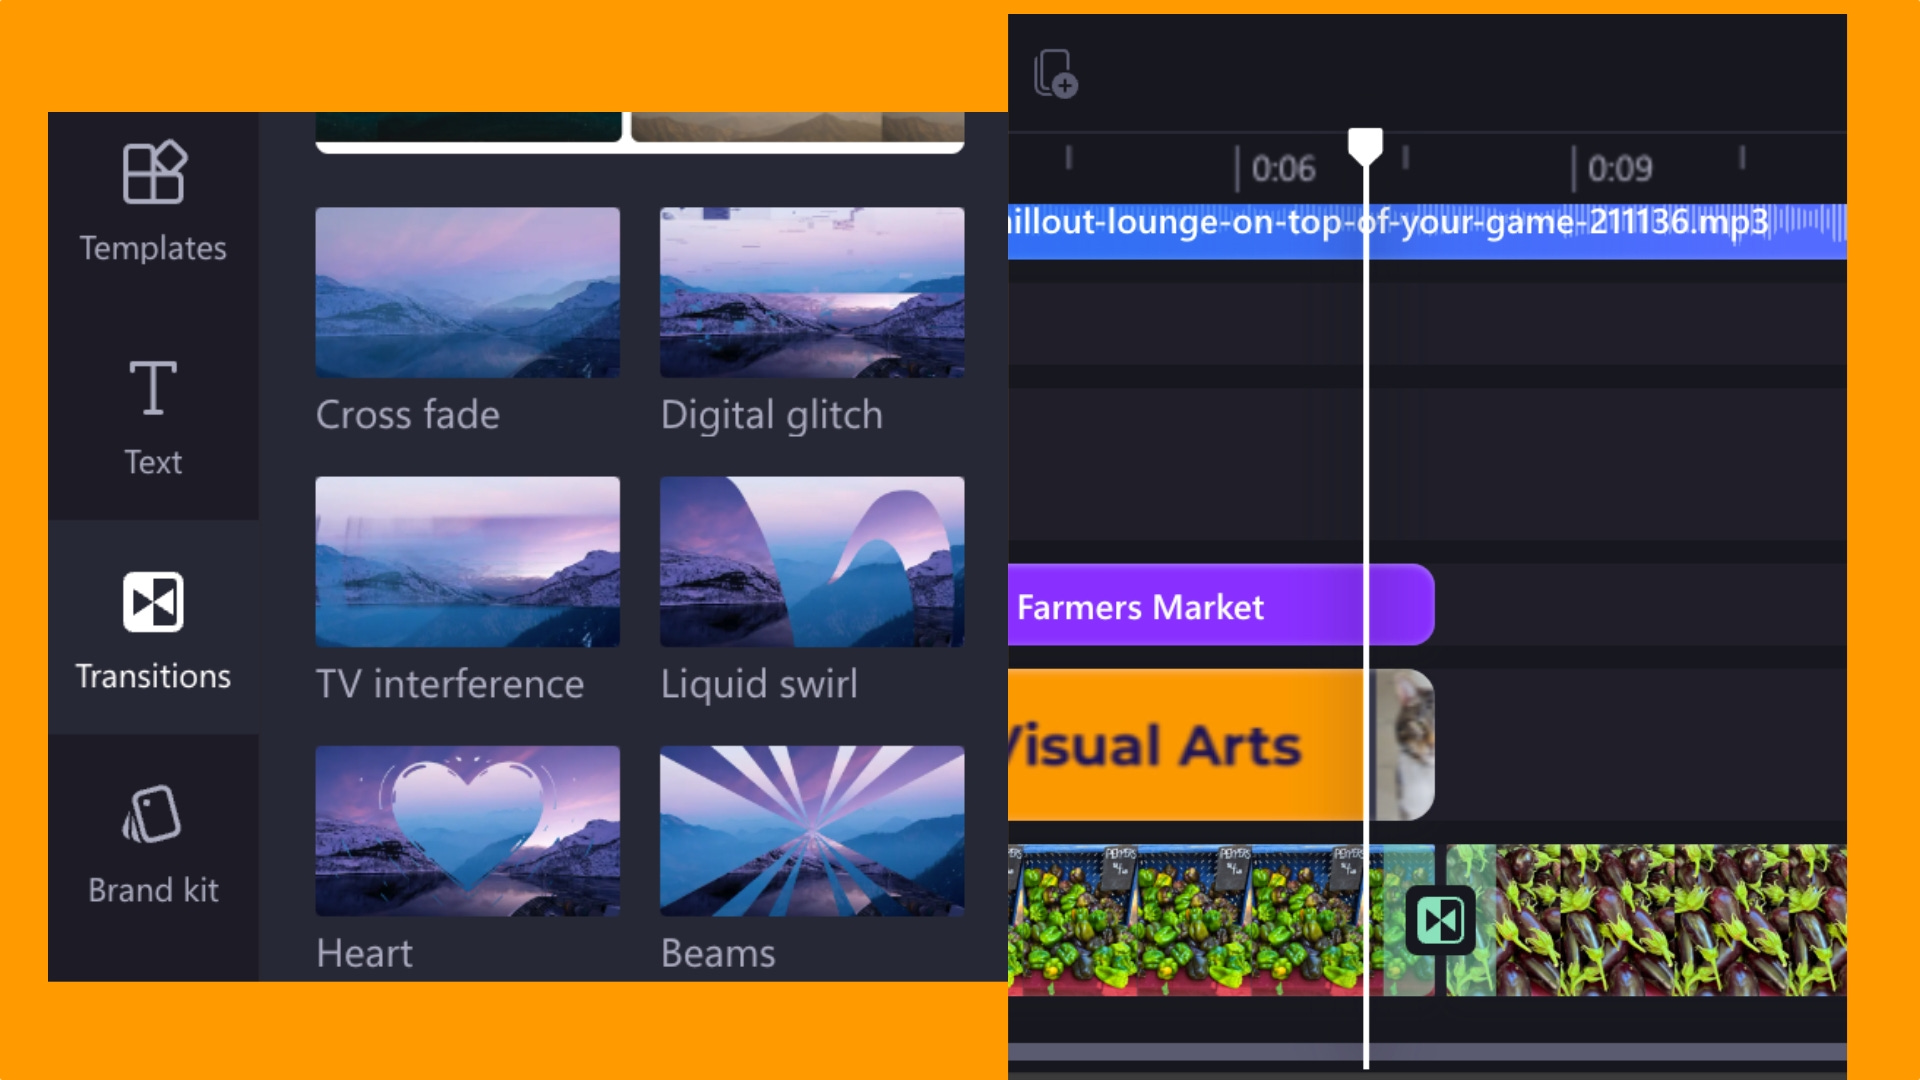
Step 6 - Add Optional Transitions Between Images
Transitions move the viewer into the next image. Most of the time I don’t use any transition effect and leave as-is. This is known as a "Jump Cut".
There many transitions available in ClipChamp Basic (used for this tutorial; upgrade for more). You can experiment with transitions to see which ones present your images best.
On the Left menu is an icon for more Transitions. There are many to try out. To use a Transition:
Click on the "Transitions" icon on the left menu bar
Click and drag the "Cross fade" item
As you move the Cross fade item notice the plus marks appear at the junctions of your images.
Place the Cross fade item at the junction of image 1 and image 2 on your timeline.
Ass you place the Cross fade, the plus symbol will change to "Add transition"
The transition is placed when the junction shows an icon overlapping the two clips.
Backup the Timeline cursor a second or two prior to the transition
Press the space bar on you keyboard to play the clip
Observe image 1 gracefully fade to image 2.
Repeat the drag and drop at each clip junction until all are done.
Consider experimenting with different transitions to learn about them
Choose a transition that best presents your images
Step 7 - Add Optional Music to Your Project
If you have music that was not already imported with your assets:
Use the "Import media" button at the top left of the window. Music will appear in your asset list as a gray waveform icon and its title and duration below.
Drag the song onto your timeline above existing images.
Be sure to align the track to the start of your project and stretch it to the end.
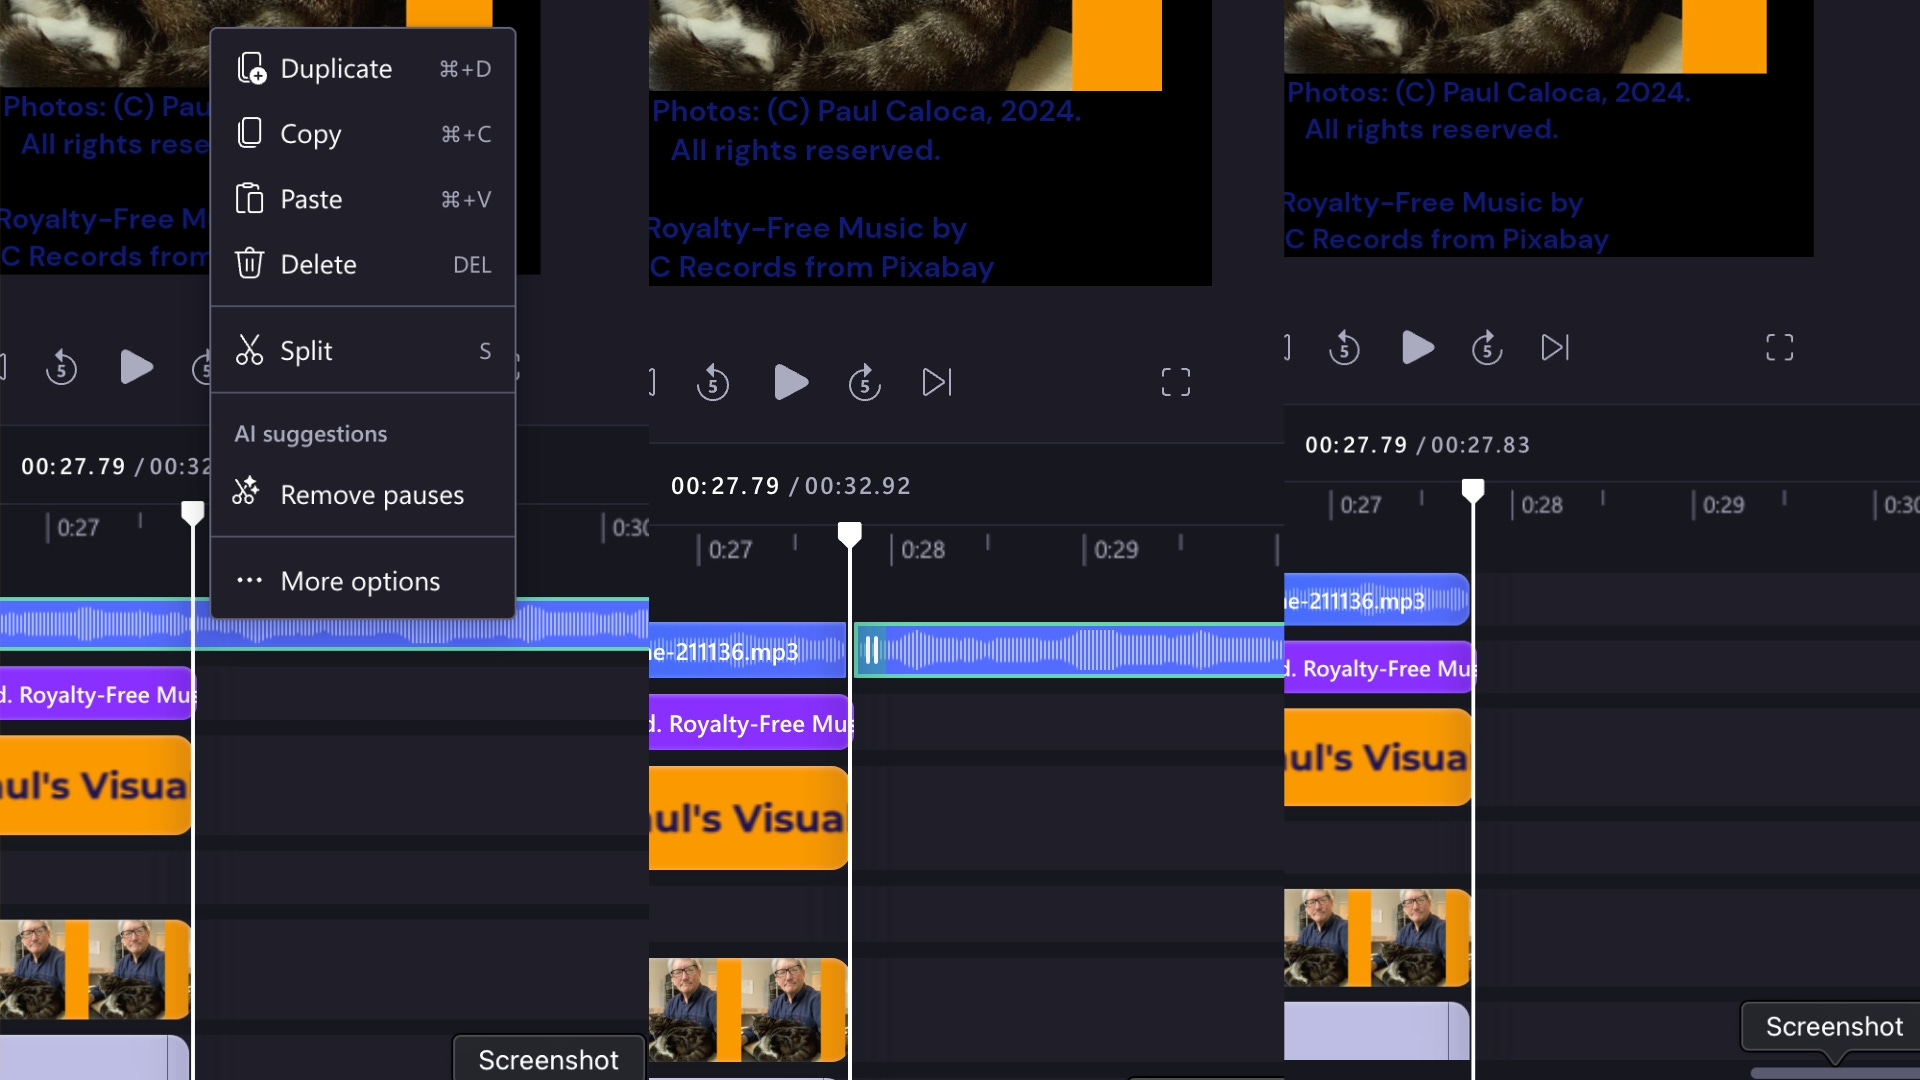
If the song exceeds the length of your project, you will need to trim it to fit:
Scroll to the end of your project
Place the timeline cursor at the end of your project
Right-click on your music track to bring up its menu options
Select "Split"
A "cut" is visible creating an independent track with its own control handles
Highlight the right side track
Hit the "Delete" button on your keyboard to erase the unneeded portion of the track
Add a 3 second "Fade out" to the track using the right side Fade menu
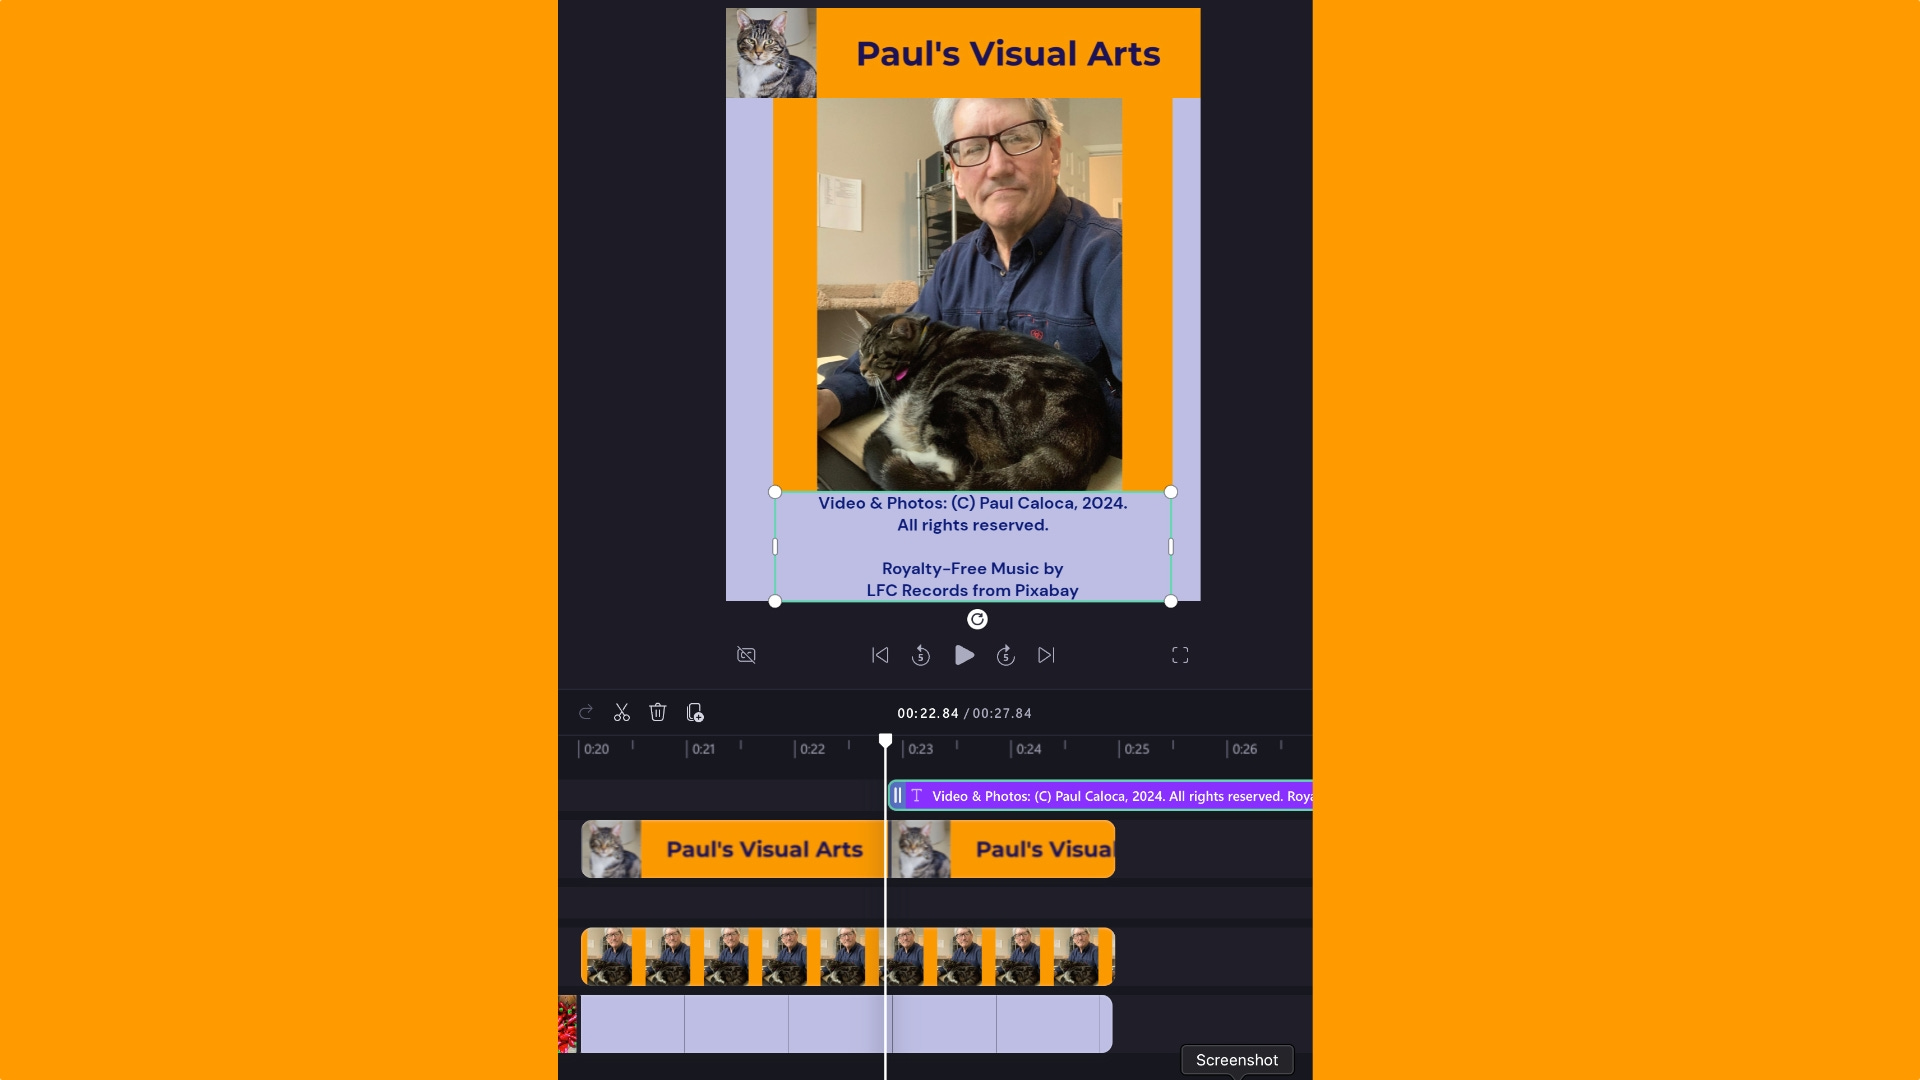
Step 8 - Add Your Final "Credits" Image
Credits are very important if you are using royalty-free stock images or music downloaded then imported into your project. Add the required attribution, for example, the music I used in the video on this page, the attribution reads:
"Royalty-Free Music by LFC Records from Pixabay"
It's that easy! Many online video editing tools, including ClipChamp, have paid royalty fees to the artists in advance and do not require attribution if you use stock images and music provided.
Add your final image from "Your media" folder to the timeline
Stretch your image to display for 5 seconds
Add any additional logos to the timeline directly above the first image, creating a stack
Add one or more text boxes to your image in appropriate places
Adjust text to color desired for readability
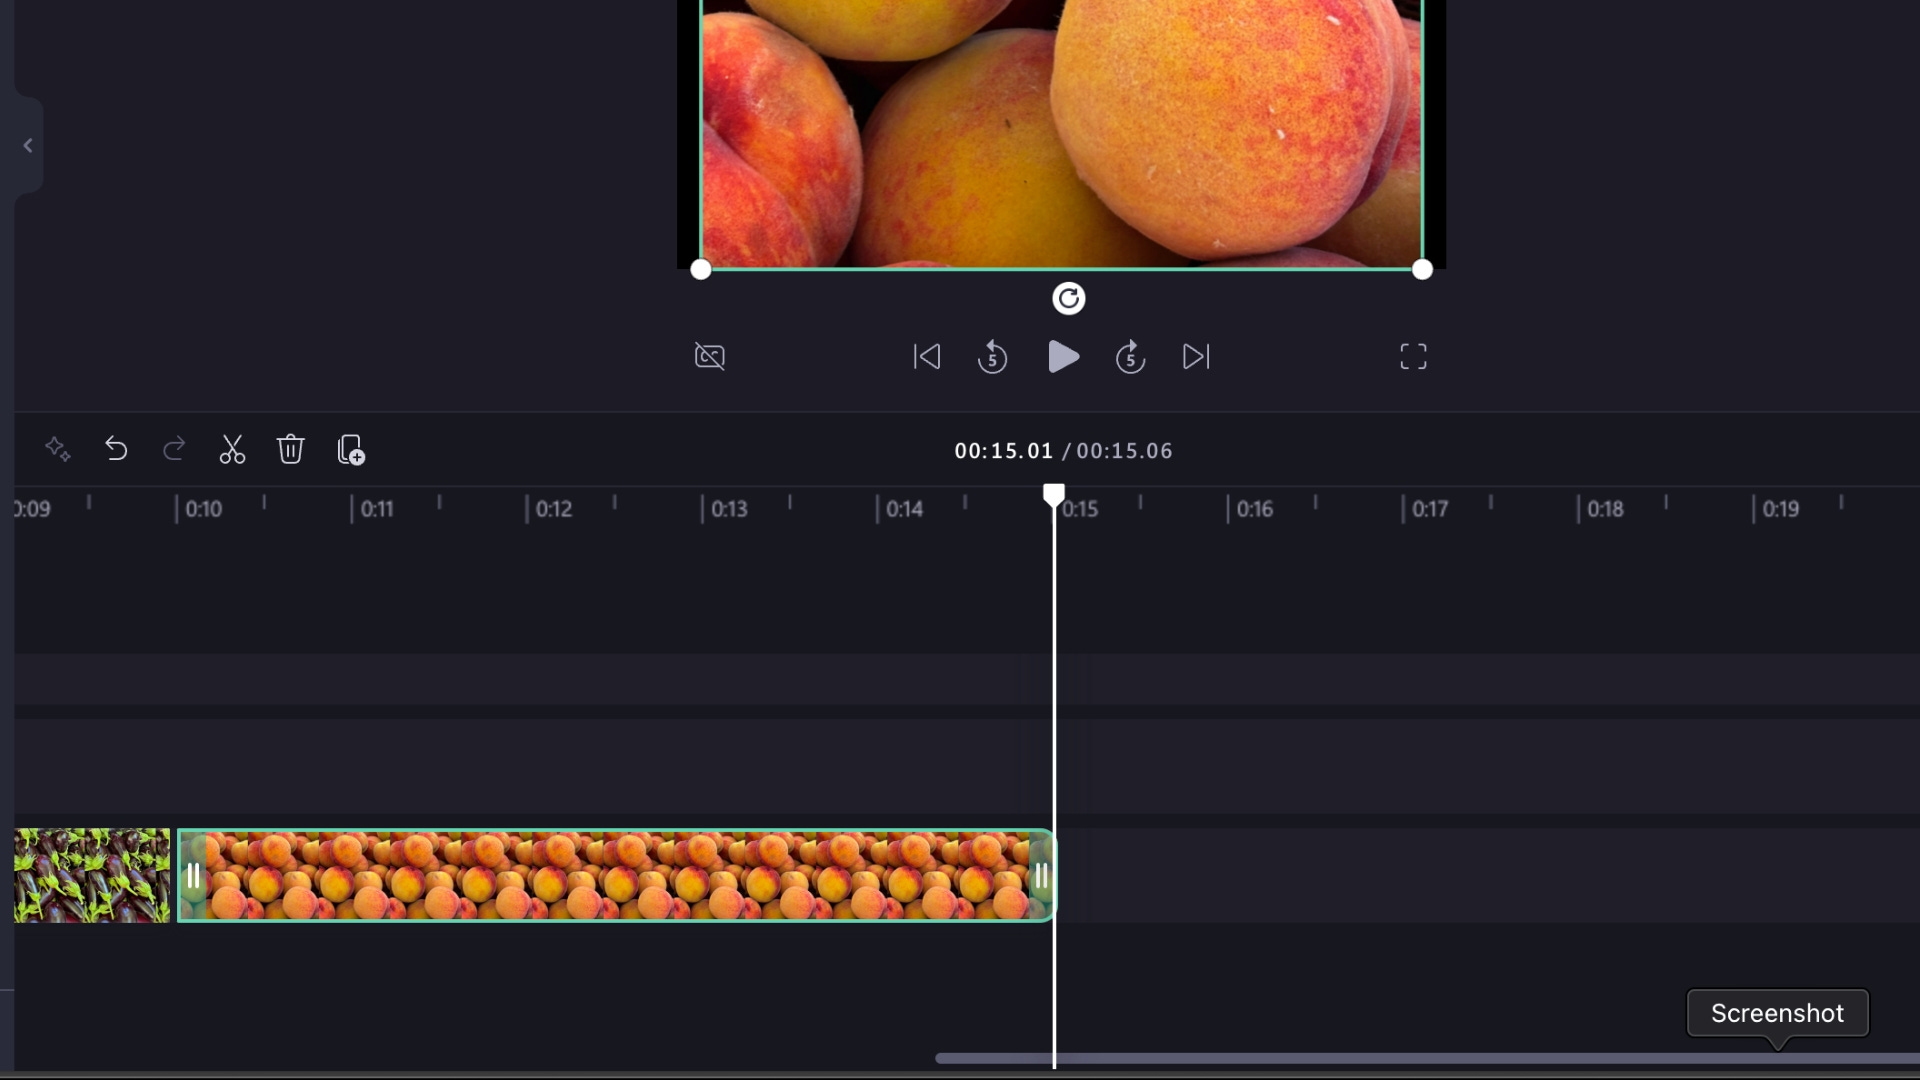
Step 9 - Preview Your Video
Play the video from start to finish. Use a critical eye to look at titles, colors, text placement, fonts, sequence. Make note of any adjustments needed. Go back to your timeline and adjust according to your notes. Preview your changes until all issues are corrected.
In the center of the image window are icons for Rewind to Beginning, Rewind 5 seconds, Play (arrow pointing right), fast-forward 5 seconds, fast-forward to end.
Use the controls to preview your video
Make notes on what needs adjustment
Make adjustments per your notes
Preview again until all adjustments are completed and video is done
Step 10 - Export Your Video & Save
The export process combines all your images, titles, and other assets into a single video file. The output file should be H.264 MP4 video for upload to social media sites. Download the new video to your local machine. Alternatively, an online video editor may allow you to link to your online storage, such as Box, Dropbox, or OneDrive as a convenient way to access your video for distribution.
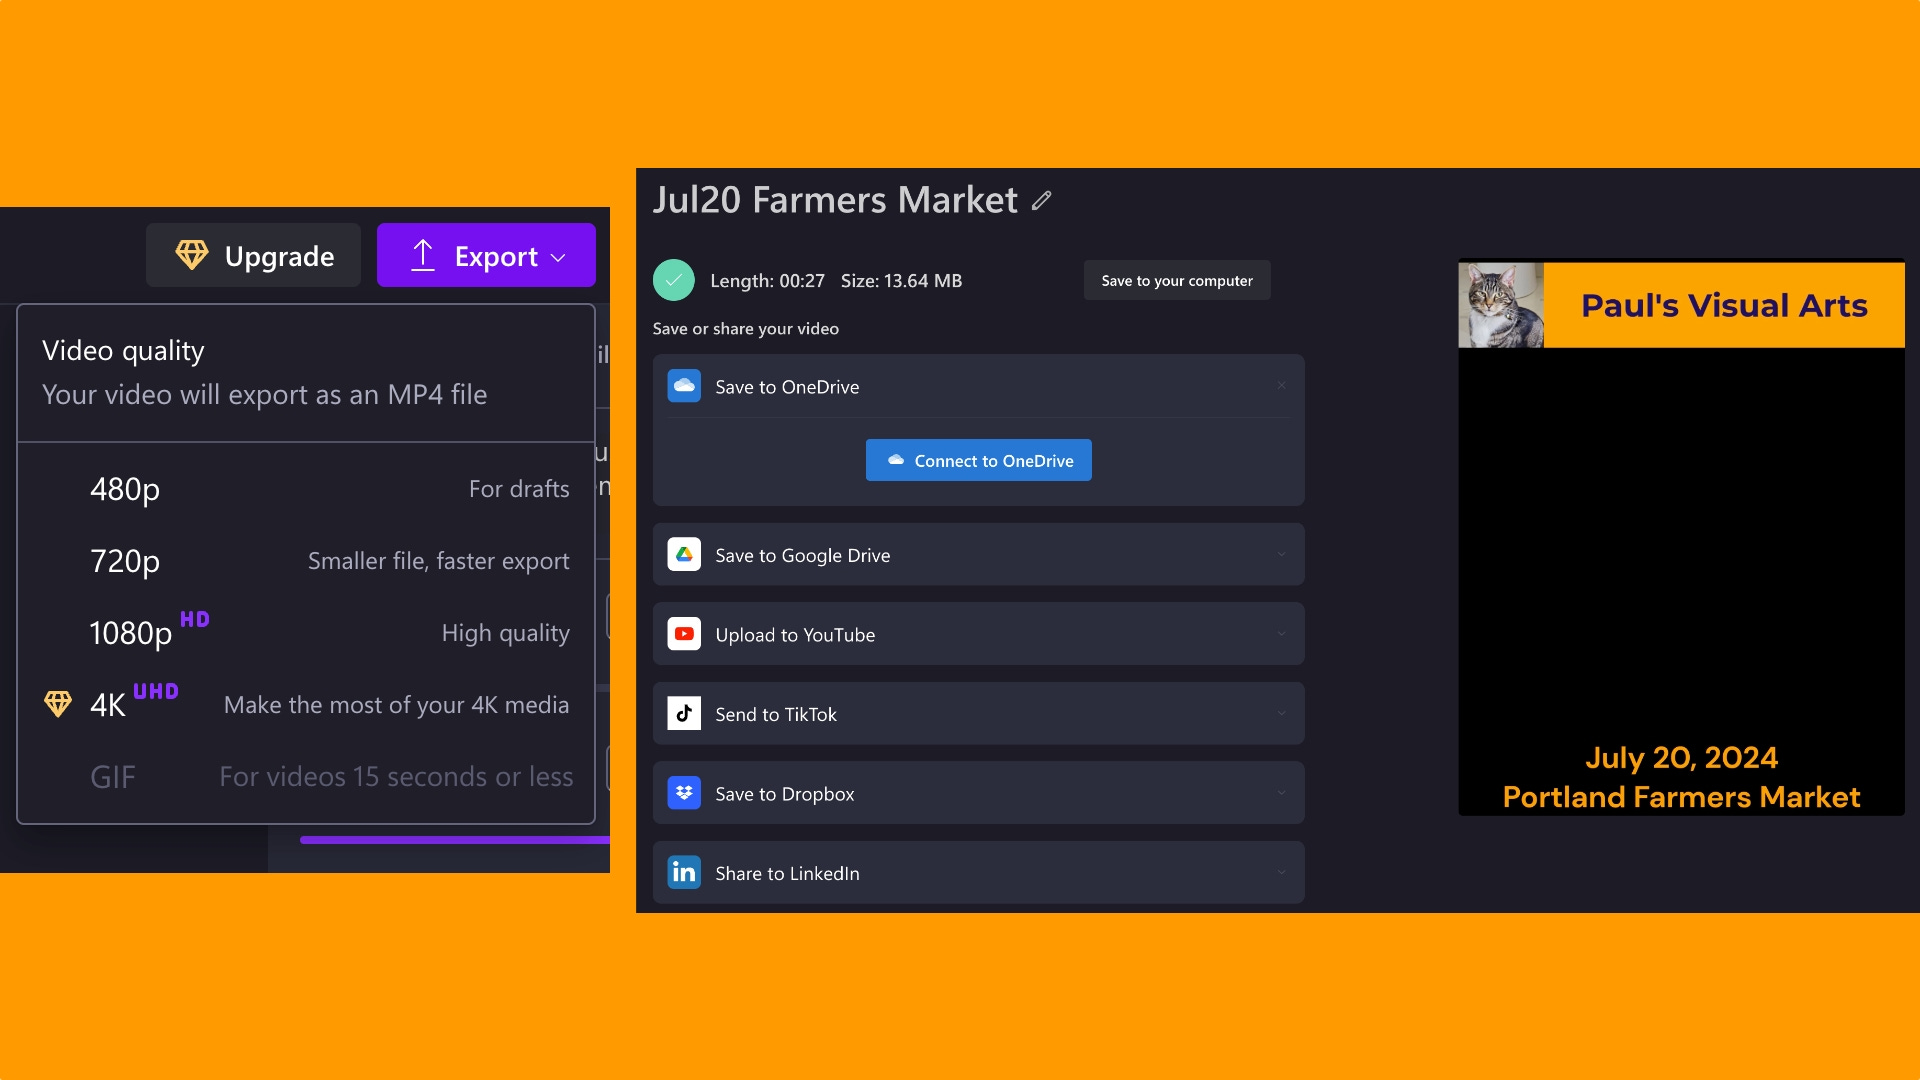
Select the "Export" button at the top right of the window
Choose your video quality
I prefer 1080p HD, as most modern smartphones support it and it works well on SubStack.com
Instagram and Facebook will work better with 720p video quality
Once export is completed, you are presented with multiple storage options
For now, select "Save to your computer" and navigate to the location where your project assets are stored.
It will be saved as an MP4 file in the location you select
Click the "Home" button and log out
Done!
Conclusion
You've learned that making a video/photo montage for upload to social media is quite easy. Plan your images to display. Place them into an appealing, colorful, sequence that tells a story. Add titles that identify to the viewer what they are about to see. Use contrasting text colors that are easy to read. Add music that fits the set of images you are presenting. Remember to use the attribution required by any stock sites. Preview your project several times to be sure everything is right. Export your project in MP4 format for upload to social media sites. Save the file to your machine or online storage. You can now upload your video to SubStack, YouTube, LinkedIn, Instagram, Facebook, or any other site you desire.
Have fun making videos for your photos!
Please let me know in the comments if you found this tutorial useful.
My husband is a videographer so understands much of what you write. I’m going to study this a little more later because I know you’ve provided information we can use for our work.. For simple photo videos I just use my iMovie on my phone.
Glad to help! 👍